Patch or Load Your Fixtures In Enlighten
Once Enlighten is installed we need to set up the show to be compatible with your lights show. By default there is a demo show loaded into Enlighten at first startup. We will need to clear this and then take the steps to load your fixtures so we can control your light show.
1. First we need to clear the demo show. This is done by simply clicking in the 'New' Icon on top of the Enlighten App. This step will only be done for the first time a new show is started.

2. A dialog will appear asking for the name of the new show. This name should clearly tell you what the show your are building.
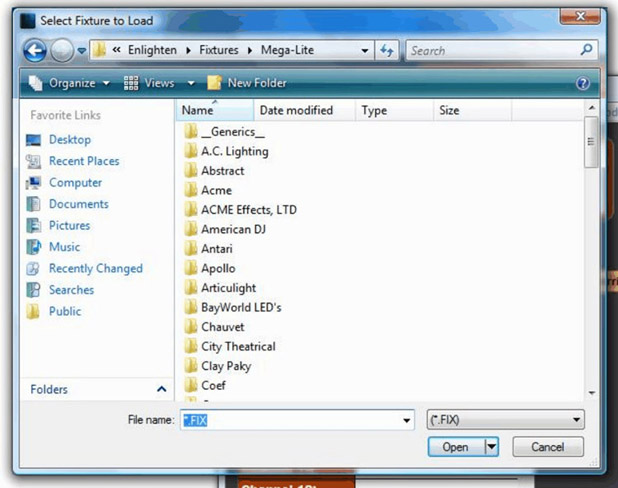
3. Next we need to load or patch the fixtures in the new light show. Press the Fixture icon on the tool bar and select 'Load/Patch New Fixture'

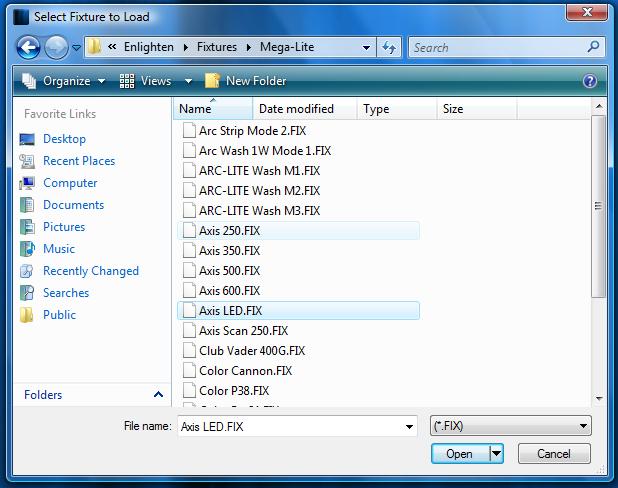
]4. A dialog will pop up with manufacturer names of fixtures. Double click on the Fixture manufacturer of the first fixtures you would like to load and find the model number in the files. If you cannot find the fixture please email dmx@mega-lite.com with a fixture request. We will send the profile within hours of the request. Once you have the fixture name press the open button to load the fixture model selected. The window below will shows the steps.
5. A Dialog will give you the status of the load and ask a final question. Answer yes to the question below. This will automatically create the fixture groups needed to make programming your lights easier.

6. Once the first set of fixtures are loaded continue to repeat steps 2 through 6 for all other fixtures you need to run your show.
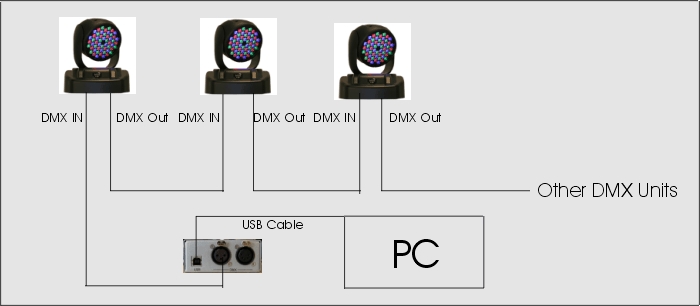
7. Once all the fixtures have been loaded you must address all fixtures in the DMX chain, Check the Addressing Fixtures Section for help with this. Make sure you have hooked up all the fixtures from one to the other in a DMX chain. The out connector from the USB will go to the first fixture in the chain and then from one fixture to the next in a In-Out manner. The illustration below shows the setup.
Related Articles
Patch or Load Your Fixtures in Disco
Once Disco is installed we need to set up the show to be compatible with your lights show. By default there is a demo show loaded into disco at first startup. We will need to clear this and then take the steps to load your fixtures so we can control ...Addressing Your Fixtures In Enlighten
Once all the fixtures have been loaded you must address all fixtures in the DMX chain, in this section we will describe the steps needed to address each fixture. 1. Make sure you have hooked up all the fixtures from one to the other in a DMX chain. ...How Patch and Control an LED Matrix in Enlighten
Controlling LED matrix in Enlighten is a simple process of patching the matrix, then creating buttons that are created by the Disco Matrix engine. Here are the steps to get your led matrix display going. First we must patch the matrix into Disco. Go ...How to Move Fixtures in the 3D Room In Enlighten
The 3d Visualizer is meant to give the user a general idea of what the room and lighting may look like. It is not meant to replace high end visualizers. The initial setup of the fixture positions can easily be accomplished using the fixture layout ...How do I 'Fan' My Fixtures in Enlighten
Fanning fixtures is a common feature found in modern lighting consoles to evenly move a group of fixtures in separate directions. In Enlighten we have a simple method to 'Fan' Fixtures following the steps below. Fixtures can only be fanned if they ...